

I've integrated OnlyOffice in a Laravel (PHP) web app recently, it was really unpleasant. The documentation is unclear and OnlyOffice is part of those softwares where the documentation gives you only 70% of the information, and you have to guess the other 30%.
So I told myself to write an article who might help a few to integrate OnlyOffice without being a pain in the ass.
Introduction
In this tutorial, I'll make sure it's clear enough for you to integrate OnlyOffice on any front/back you wish to use. I'll use Laravel and vanilla JS in my examples on Docker. You can use any language and framework for backend/frontend.
Getting started
We'll start the OnlyOffice container, I'll use docker compose to simplify the configuration:
services:
  onlyoffice:
    image: onlyoffice/documentserver
    ports:
      - "8001:80"
    environment:
      JWT_SECRET: ${JWT_SECRET:-secret}
      ALLOW_META_IP_ADDRESS: "true"
      ALLOW_PRIVATE_IP_ADDRESS: "true"
Now let's create our env file (.env) with the JWT secret:
JWT_SECRET=jwtOf course, you shall choose a secure secret to use in production with a tool like this one.
Then, let's start the container:
docker compose up -d onlyofficeNow, you can open your browser to http://localhost:8001 and you should see this page:
For the purpose of this tutorial, I will integrate this compose service in a fresh Laravel installation, but you can use any language or framework you want. Your OnlyOffice service should be reachable by your backend service, so I'll use the default internal compose network.
So now, I add my backend in the compose file, you shall replace the back service with your code/language :
services:
  onlyoffice:
    image: onlyoffice/documentserver
    ports:
      - "8001:80"
    environment:
      JWT_SECRET: ${JWT_SECRET:-secret}
      ALLOW_META_IP_ADDRESS: "true"
      ALLOW_PRIVATE_IP_ADDRESS: "true"
  backend:
    image: bitnami/laravel
    volumes:
      - ./:/app
    ports:
      - "127.0.0.1:8000:80"
View initialization
So now the backend is on the same network as OnlyOffice. It's important because OnlyOffice and the backend will communicate with each other. Plus, the OnlyOffice container will be accessed by the user's browser.
In this case, I'm using Laravel as a backend and frontend framework, but you can just integrate the frontend part on a distinct JS framework.
Let's first create a view to integrate the editor with a basic html sturcture. You need to integrate the OnlyOffice JS script for the integration, available at : http://onlyoffice_url/web-apps/apps/api/documents/api.js
<!DOCTYPE html>
<html lang="en">
<head>
    <meta charset="UTF-8">
    <meta name="viewport" content="width=device-width, initial-scale=1.0">
    <title>OnlyOffice Editor</title>
</head>
<body>

<script type="text/javascript" src="{{ env('ONLYOFFICE_BROWSER_URL', 'http://localhost:8001') }}/web-apps/apps/api/documents/api.js"></script>
</body>
</html>
The editor view
I'm using and environment variable to set the OnlyOffice Browser URL. Note that I'm setting “browser URL” because there will be an OnlyOffice internal URL later.
In the associated controller, there's nothing but the view for now:
<?php

namespace App\Http\Controllers;

class EditorController extends Controller
{
    public function editor()
    {
        return view('editor');
    }
}
The EditorController
Database
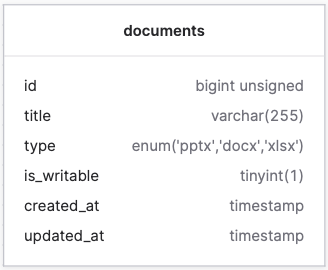
So I create a basic “documents” table to handle the documents easily :
Documents list
In the view body, I'm setting a basic list to select the document to edit:
public function editor()
{
    $documents = Document::all();

    return view('editor', [
        'documents' => $documents,
    ]);
}
EditorController@editor new content
<body>
    <ul>
        @foreach ($documents as $document)
            <li>
                <a href="/editor/{{ $document->id }}">Edit "{{ $document->title }}"</a>
            </li>
        @endforeach
    </ul>

<script type="text/javascript" src="{{ env('ONLYOFFICE_BROWSER_URL', 'http://localhost:8001') }}/web-apps/apps/api/documents/api.js"></script>
</body>
New view body
I'm redirecting the user to /editor/{documentID} on click as you can see, I'm redirecting to the same controller method and view:
Route::get('/editor', [EditorController::class, 'editor']);
Route::get('/editor/{document}', [EditorController::class, 'editor']);
Router file
This is just a quick an ugly way to select a document for the example:

OnlyOffice SDK integration
Now we need to initialize the JS SDK to connect to OnlyOffice and display the canva editor.
Before all, I'll need an empty return method, necessary to create a new document (it really needs to be completely empty and with a Content-Type: text/html header:
public function empty()
{
    return '';
}
Firstly, I add the currently selected document:
  public function editor(?int $document = null)
  {
      $documents = Document::all();
      $currentDocument = Document::find($document);

      return view('editor', [
          'documents' => $documents,
          'currentDocument' => $currentDocument,
      ]);
  }
EditorController@editor
And below the <ul> I add the OnlyOffice placeholder if a document is selected:
@if(isset($currentDocument))
    <h2>You're currently editing: {{ $document->title }}</h2>
    <div id="placeholder"></div>
@endif
Editor view
Then, I can set the OnlyOffice initialization script below its imported script tag:
<script type="text/javascript">
  new DocsAPI.DocEditor("placeholder", {!! $payload !!});
</script>
Editor view
As you can see, I'm adding a new variable, $payload. This variable is unescaped html as you can see with the structure {!! !!} because it's JSON. So the payload variable is
Here is the variable definition:
$doesFileExist = file_exists(storage_path("documents/{$currentDocument->id}.{$currentDocument->type}"));
$payload = [
    'document' => [
        'fileType' => $currentDocument->type,
        'key' => str_replace(['.', ':', '+', ' '], '', (string) ($currentDocument->id.$currentDocument->updated_at)),
        'title' => "{$currentDocument->title}.{$currentDocument->type}",
        'url' => $doesFileExist ? env('BACKEND_URL')."/documents/{$currentDocument->id}/download" : env('BACKEND_URL')."/empty",
    ],
    'documentType' => match ($currentDocument->type) {
        'docx' => 'word',
        'xlsx' => 'cell',
        'pptx' => 'slide',
    },
    'editorConfig' => [
        'callbackUrl' => env('BACKEND_URL').'/editor/save',
        'user' => [
            'id' => 0,
            'name' => 'John Doe',
        ],
        'lang' => 'en',
        'mode' => $currentDocument->is_writable ? 'edit' : 'view',
    ],
];
EditorController@editor
Let's break down each option:
- document.fileType: The document extension, must be a supported one: https://api.onlyoffice.com/docs/docs-api/usage-api/config/document/#filetype
- document.key: The document key is a unique string for OnlyOffice to know when the document is updated on the document storage. It's pretty hard to explain but very important to make it correctly. When OnlyOffice edits a document for the first time, it will download it from a given URL. Then OnlyOffice saves the document locally in its memory and whenever you want to edit it, just opens the document in its web editor for you. But if you update the document file where it is stored without using the OnlyOffice editor (replacing the file by another one for example), how will OnlyOffice know that it needs to download the document agin? Thanks to this key. That's why everytime the document file is updated, you need to regenerate a unique key. So that's why in my case, I'm using
$currentDocument->id.$currentDocument->updated_at. The document id is unique per document and updated_at will be updated every time the document is updated, so it's always unique. Plus, I'm doing a str replace to remove the symbols from the datetime, because those symbols are not supported by OnlyOffice in the key. Please use a[a-zA-Z0-9-]key. - document.title: The title displayed in OnlyOffice header (you can set whatever you want)
- document.url: The URL where OnlyOffice can download the document. As you can see here, I'm first checking if the document file exists. Because if it's a new document (no existing file), you need to send an empty response to OnlyOffice so it creates a new document (the
empty()method we created earlier). It must be a direct download URL, without authentication or anything else. To secure the URL, I advise you to use UUIDs or generate a short lifetime URL, and restrict the URL access to private IP addresses or the OnlyOffice server URL.
In my case, the /download URL method is just this:return response()->download(storage_path("documents/{$document->id}.{$document->type}"), "{$document->title}.{$document->type}"); - documentType: Here you must tell depending on your extension basically which software to use: Word, Excel or PowerPoint. So you need to match any Word extension to word, Excel extension to cell and the others to slide. Please note that OnlyOffice supports PDF, but I'm not using them in my example (but you can just match on PDF).
- editorConfig.callBackURL: The URL OnlyOffice will call to tell you the document has been updated, and you need to save it again (and update the famous key). We'll see later how to create it.
- editorConfig.user: The current user id and name editing the document (used for collaboration mode to display the user's name and the id is used to differentiate the users).
- editorConfig.lang: The displayed editor language
- editorConfig.mode:
editshows a full editable editor,viewshows a readonly editor.
Many other parameters are available for OnlyOffice configuration, you can see them in the documentation:

We're almost there!
Now we just need to generate the JWT with the JWT secret we defined earlier in OnlyOffice.
I'm using the firebase/php-jwt PHP library in my case:
$payload['token'] = JWT::encode($payload, env('JWT_SECRET'), 'HS256');Add this below the $payload definition.
So the JWT in the payload and the JWT must be included itself in the payload. The JWT_SECRET env variable is the same defined in OnlyOffice of course, or it won't work.
Now I'll just pass the JSON encoded final payload to my view:
return view('editor', [
    'documents' => $documents,
    'currentDocument' => $currentDocument,
    'payload' => json_encode($payload, JSON_UNESCAPED_UNICODE),
]);
EditorController@editor return
Now just click on a document and you'll should see the editor:

I added some CSS to make the editor bigger:
<style>
    iframe {
        height: 800px;
    }
</style>
editor.html
Document saving
Now we need to save the document. So how does the save work? After you left the editor page (yes, only after you left it), about 10 seconds later, OnlyOffice will call the editorConfig.callbackUrl we sent him in the payload, in my case:
'callbackUrl' => env('BACKEND_URL').'/editor/save',So now, we have to add the /editor/save method:
Remember, this method will be called by OnlyOffice, so as the direct document URL we sent in the payload, this URL must be accessible without authentication. Once again, to secure it, you could set a query string token (avoid short time life URL as you don't know how much time the user will be editing the document).
public function updateFile(Document $document, Request $r)
{
    if ($r->integer('status') === 2 || $r->integer('status') === 6) {
        $url = preg_replace('#^https?://[^/]+#', env('ONLYOFFICE_BACK_URL'), $r->input('url'));
        Storage::put("documents/{$document->id}.{$document->type}", file_get_contents($url));
        $document->updated_at = now();
        $document->save();
    }

    return new JsonResponse([
        'error' => 0,
    ]);
}
EditorController@updateFile
So in this method, we first check if the status is 2 or 6. This is the status sent by OnlyOffice to tell you the file has been updated and you need to store the updated version. My regex replace is because the url to download the file from OnlyOffice starts like this: http://localhost:8001/cache/files/...
But localhost:8001 cannot be accessed as I'm in another container, so I replace it by the OnlyOffice back URL: http://onlyoffice
Now I put the file content in a directory. Here you can put the file wherever you want (S3 or whatever cloud you want), you just need to write the downloadDocument method accordingly.
Testing
Here we are, it now should work. To test it completely, write something in a doc, and close the page (or just go on another document). Wait a few seconds and if everything works fine, you should see your docs created in your storage:

Now just delete and re-create the OnlyOffice container (to be sure there's not local copy saved):
docker compose stop -t 0 onlyoffice
docker compose rm -f onlyoffice
docker compose up -d onlyoffice
Wait a minute for the container to initialize and refresh your browser on a file you edited and check what you wrote is inside the document.
Conclusion
I'm glad you followed the tutorial up to the conclusion, and congrats about the OnlyOffice integration. Please leave a comment if something is unclear or doesn't work as expected, I'd be glad to help.
Debugging

Whenever you see this modal, it's because your callbackUrl doesn't work properly. I advise you to use a webhook dumper to show the webhook content, like https://hooktap.dev/ (just go on the site, copy your link, replace the callbackUrl by your link and update the doc).


Discussion